Kitchen Diaries

Tuesday 27 April 2010

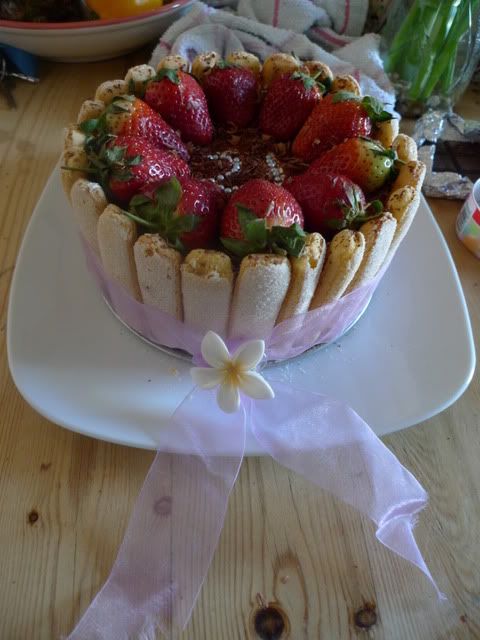
Tiramisu cake

It was my friend's 21st last week, so me and my other friend decided to join forces and make her a cake.

Photobucket

I lie though, because this isn't strictly a cake, but actually tiramisu stacked with lots of sponge fingers. It's actually a really simple thing to do, and great for people who don't have a lot of confidence in their oven (see my post "death of a chocolate cake" if you're wondering what I mean).

Tiramisu cake (makes a 7" cake)

Ingredients

Espresso Syrup:
1 tablespoon strong instant coffee powder or espresso powder
1/2 tablespoon sugar
1/2 cup (125ml) boiling water
1 tablespoon Tia Maria or brandy

Filling:
250g mascarpone cheese
1 1/2 teaspoons vanilla extract
3 tablespoons icing sugar
2 tablespoons Tia Maria/brandy
1 cup (250 ml) double cream

Sponge fingers (I bought 2 packs of 24 and used 30ish. If they are thicker than the standard sponge fingers you get in the supermarket then obviously you won't need as many)
50g dark chocolate


dark chocolate shavings(optional)
strawberries for decoration (optional)


Method:

To make the Espresso Syrup:
1. Dissolve instant coffee powder and sugar in boiling water (or make your espresso with the 1/2 cup of boiling water).
2. Leave to cool, then stir in 1 tablespoon of brandy. Set aside.

To make the Filling:
1. Whisk mascarpone cheese with icing sugar, vanilla extract, brandy and 3 tablespoons of the espresso syrup until blended.
2. Whisk the whipping cream until it forms soft peaks (I'd reccomend using an electric mixer, but be careful not to over whip).
3. Mix in 1/4 of the whipped cream to the mascarpone mixture, then carefully fold in the remaining whipped cream to the mascarpone with a spatula.

To assemble the cake:
1. Line the sides of a 7" round cake tin (either springform or with a removable base) with the sponge fingers (do not dip them in the espresso syrup). If the last sponge finger doesn't fit nicely then trim it so it fits in. Cutting off the ends will help them to stand up if they keep sliding around.
2. Gently dip the remaining sponge fingers one at a time in the espresso syrup, and use them to line the base of the pan. Cut them into shorter lengths to fill the whole of the circular base.
3. Spoon half the filling on top, spread evenly and grate dark chocolate over it.
4. Repeat with another layer of dipped sponge fingers and spoon over the remaining filling.
5. Cover and refridgerate for at least 4 hours (but preferably overnight).
6. Before serving, remove the sides of the cake tin, grate over more dark chocolate. If you want large chocolate shavings you can use a potato peeler. Decorate with strawberries. We also added silver balls cos they are awesome.
7. Add a ribbon, candles and surprise someone in the venue of your choice :)
Saturday 24 April 2010

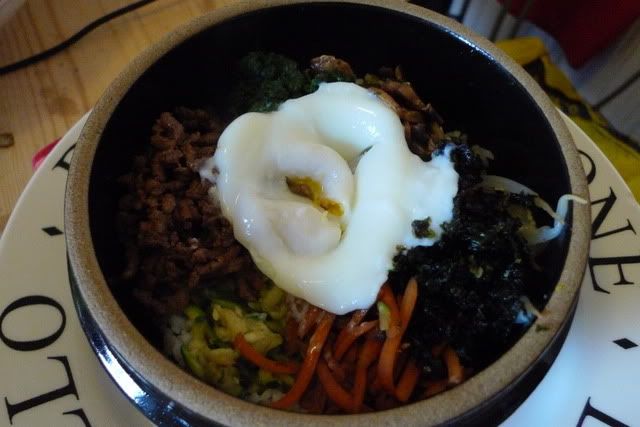
Bibimbap

Bibimbap is a Korean dish which literally translates as "mixed rice". The first time I went to a Korean restaurant I was unfamiliar with everything on the menu, and ordered this just out of curiosity. And then I fell in love... effectively it's a bowl of rice topped with vegetables, beef, an egg and chilli sauce, but then you mix it togther and it is so much more than that. This is not just mixed rice, this is M&S mixed rice... Ahem. Sorry, anyway, the best type of bibimbap is dolsot bibimbap, which just differs due to the fact that it's served in a stone bowl which is heated up on the stove beforehand. This continues to cook the rice once you add it to the bowl, making it all crispy, and it also keeps the food hot. Making bibimbap is a little labour intensive, but totally worth it. If you've had it before, you should get what I mean, and if not, I will cook you some and you'll understand :)

Photobucket


If you're wondering why the egg is a bit funny looking, that's because it's poached, not fried.


Bibimbap (serves 2)

1 cup of cooked sticky rice (or thai fragrant rice if you don't have that)
1/2 packet of beansprouts
1 courgette, julienned
1 carrot, julienned
2 mushrooms
handful of spinach
200g beef mince
2 eggs
Soy sauce, garlic, sesame seeds, sesame oil, vegetable oil and hot pepper paste*

This recipe involves cooking lots of veggies separately which you'll then add to the rice when you're done. So just place them all on a large plate so you can easily arrange them in the bowl afterwards.

1. Put beansprouts in a pot of water, add a pinch of salt and boil until soft. Drain and mix with a dash of sesame oil and 1 tbsp sesame seeds.
2. Quickly boil spinach until just cooked, then mix with a small clove of minced garlic, sesame oil and a pinch of salt.
3. Saute carrots with a little sesame oil until just cooked.
4. Mix julienned courgette with a pinch of salt and saute.
5. Saute mushrooms with 1 tsp of sesame oil. Add 1 tsp of soy sauce and 1/2 tsp of sugar whilst cooking.
6. Cook the mince, and add 2 cloves of minced garlic, 2 tsp of soy sauce, 1 tsp of sugar, black pepper and a little sesame oil.
7. Fry the eggs sunny side up. If you don't want fried eggs, you can make omelette and cut it into little strips. I actually used poached eggs because I still haven't got over how easy it is to make poached eggs in the microwave.
8. Put half the rice in a bowl and arrange vegetables and meat, then top with an egg. Repeat for the second serving.
9. Serve with hot chilli paste, mix and enjoy!

*In korean, this is called gochujang. You can get it from oriental supermarkets, but there isn't really anything it can be substituted with. If you don't have it then you could use some other kind of sauce you like...spicy ketchup, sweet chilli sauce? It won't taste the same but will still be good :D

Friday 16 April 2010

Microwave poached eggs

When I first started uni, I was missing the egg poacher we had at home and set about trying to find the easiest method to poach eggs. I actually looked at this b3ta feature on how to do it, and yeah, the traditional method did not work for me either. Nor did vortexting it. So I settled with doing it in food wrap for a while, until it occurred to me that even the microwave safe stuff isn't actually supposed to come into contact with food when it cooks. I hadn't yet come across a Daily Mail scare warning me that boiled cling wrap gives you cancer, but I thought it best to stop doing that, and instead started poaching my eggs in a ladle (which works reasonably well, but means you have to hold the ladle the whole time).

However, a few days ago I found out how to make perfect poached eggs in the microwave, and it is SO easy. So here we go:

Get a bowl full of boiling water. Crack the egg in it. Microwave on high for 30 seconds to a minute (depending on the strength of your microwave and how well cooked you like your eggs. Ours is 700W and I like my eggs with the yolk completely runny, so I do it for about a minute). Remove from the water with a slotted spoon.

Don't even think about bothering with one of those awful plastic microwave egg poachers. I once bought one from tesco and the eggs came out all disgusting and rubbery. So yeah. If you like eggs, this will change your life. If not, then you're a disgrace. How can you not like eggs?! Get off my blog.

Wednesday 31 March 2010

Pear and cardamom tarte tatin

This post is exciting, because I actually have a proper recipe for you all (and by you all, I mean the 3 people that probably don't bother reading this anymore. But oh well). It's my mum's birthday tomorrow, and she isn't a huge fan of cake, so I decided to make her an alternative instead. It's quite difficult baking for her, as she isn't always a fan of classic yummy things that people normally like. Luckily I didn't have to think too hard, because I was stalking, er, browsing on facebook and I found a recipe for pear and cardamom upside down tart, which I thought sounded nice and suitably unusual. It also sounded a lot like tarte tatin, which is one of my favourite desserts, and I have made it a few times, so I decided to modify recipe to make it more like pear and cardamom tarte tartin, as I thought shortcrust pastry would keep better than the puff pastry specified by the original recipe.


Not pretty, but pretty yummy


Making tarte tatin is pretty simple. Effectively it's just caramelised fruit put in a flan dish, with the pastry laid on top. After it's baked in the oven, you turn it out on a plate, so there's no hassle of having to bake a pastry case beforehand. The method of preparation means it's not the prettiest dessert in the world, but the taste makes up for it. Don't be afraid of making your own shortcrust or puff pastry, it's seriously easy, and once you've done it you'll realise there's no need to buy frozen pastry ever again. I also decided to make some toffee to put on the top. I was going to make spun sugar (those fancy sugar threads you get on desserts) out of it, but then changed my mind in case it made too much of a mess. I later burnt my finger on the molten sugar whilst trying to pour it on the tart and it hurt like a bitch. My finger is still stinging like crazy :( bear in mind this happened at midnight while my mother was sleeping, so I had to dance around the kitchen screaming silent expletives until I came to my senses and stuck it under a cold tap. So yeah, as long as you excise some caution when dealing with boiling hot sugar, this is a pretty hassle free recipe. If you don't like the idea of pears and/or cardamom, you can swap them for more traditional apples, peaches, pineapple or any other fruit you fancy.

Pear and cardamom tarte tatin

125g sugar
3 tbsp cold water
10 cardamom pods
4-6 pears, cored and quartered lengthways
100g butter
1 quantity of shorcrust pastry (see below)

1. Put sugar, water and butter into a deep frying pan. Stir over a low heat until the sugar has dissolved. Increase the heat and bring to a rapid simmer.

2. Remove seeds from cardamom pods and crush. As the sugar begins to colour, sprinkle over the cardamom and add the pears. Stir occasionally and cook for about 10 minutes, until the sugar starts to turn golden brown and the pears start to become soft.

3. Pour pears and sugar into a flan dish, and leave to cool for a few minutes.

4. Meanwhile, roll out your pastry into a circle which is just larger than the flan dish. Put the pastry over the pears, tucking it down the sides of the pan to enclose the fruit.

5. Bake in the oven at 400F/Gas mark 6 until the pastry is golden. Remove from the oven and cool for 10 minutes before turning out onto a plate.

6. Serve with creme fraiche


Mmm, caramelised pears
And...I will let Delia explain how to make the shortcrust pastry ;)

Good luck, and remember: approach hot sugar with extreme caution!

Bonus "isn't my cat cute" photo


My cat, Rudy. Isn't he cute?!

P.S. If anyone is reading this and knows a bit about html, please help me. Blogger photo uploader sucks and I don't know why it keeps inserting so many line breaks even though I edit the html so it shouldn't do :(

Monday 15 March 2010

Death of a chocolate cake

It might seem odd that I've decided to blog about a chocolate cake which was initially a failure...but that's only because with the help of my flatmates, I managed to salvage it and turn it into something beautiful. Well, ok, something.

Anyway, my plan was to make a chocolate layer cake for my friend's birthday. It was going to be decorated with chocolate curls, ganache and strawberries. It was going to be a work of art in sponge cake form. 6 bars of chocolate...off I go. I thought I would it would be the decorating stage where something went wrong, but unfortunately I never got there, because our bitch of an oven decided to burn the top of the cake whilst leaving the middle undercooked (I think I should do a separate post about our bitch oven, as we've lost so many cakes to that thing). I didn't know that some of the sponge was still slighly raw, and only found out when trying to slice the cake into layers, which caused it to crack.
"Shit! Fuck! Damn! dsdhfudthruoghdooshdygh. Whyyyyyyyyyyyyy?!?!"

I doubt anyone wants to hear about the minature fit I had in the kitchen that day, but I couldn't let that chocolate sponge go to waste (most of it was fine). So I took a knife to the already quite dead cake and cut it into bite sized pieces, layering them in a bowl with chocolate cream and strawberries.


(yeah ok, I admit it, I did only just post this so I had an excuse to draw faces on those strawberries)

There was still quite a bit of sponge left, and I did actually want something resembling a cake, even if it was going to be tiny. So I grabbed a heart cookie cutter and cut 3 hearts out of the remaining sponge, stacked them and decorated it with more chocolate and strawberries. It turned out a bit like one of those mini one-portion birthday cakes you can get in gift shops.


What was left was one layer of sponge, which had a rather strange shape due to bits being cut out of it. But it still had potential to be transformed...


...into a vomit cake! Crumbled biscuits were added to some chocolate cream for extra effect. Clearly my creativity knows no bounds.

I didn't actually give the vomit cake to my friend because I couldn't carry 3 cakes, so kept it for me and my flatmates to enjoy. Which we did, with beer. Thankfully no one actually vomited, because the cake tasted nice and the beer ran out before anyone got anywhere near to that stage. I'm not going to post the recipe for the chocolate sponge, since if you want to try this yourself it's not incredibly difficult to mess up baking a cake. My personal tips would be turning on the oven too high, adjusting the quantity of mixture but not adjusting the cooking time, or adding too much baking powder. Alternatively, get yourself a terrible oven like ours (if you're a student, chances are your shitty landlord has already provided one. Lucky you!).

There's no real moral to this story, but what I'm trying to say is that if something goes wrong in the kitchen, you can usually make the best of a bad job, and have some fun doing it at the same time :) Apart from if you put too much chilli in something. Adding water, sugar or yogurt can help up to a certain point, but after that you may as well chuck it in the bin before you end up killing your tongue eating it out of stubbornness.

Happy baking!

Sunday 14 March 2010

Preserves of epic proportions

Encouraged by my friend's newly created food blog, and my flatmate and I sitting in the kitchen obsessing over complicated desserts (macarons, anyone?), I decided to revisit here. I think the reason why I never really got very far with this blog is because I always forgot to take pictures of what I'd made, and felt that it would be pointless to update with recipes when I had no accompanying photos. Because, let's face it, loads of people read food blogs not just for the recipes, but for all the photos of amazing food. I'm also not that great at photographing food to make it look mouth-wateringly appetising; unless it's already pretty and delicate I quite often end up with a picture of something resembling mush, even though it usually tastes a lot better than the picture implies.

Anyway, I digress; I realised that over a year has passed since I last touched this blog, and that I must have a backlog of food photos on my computer, some of which have to be decent. Thinking back to last summer (as it is difficult to recall the exact nature of my kitchen adventures past then), I remembered going to my cousin's house to make preserves. We made a lot and the whole thing took about 2 days, including picking some of the ingredients (she has loads of fruit trees in her garden) and a trip to tesco which yielded a massive amount of sugar and vinegar.

This is what we did...

Massive pot full of freshly picked blackberries


Yes, this is really the amount of sugar that goes into jam


Boiling crab apples for crab apple jelly


If you don't know what crab apples are, they're basically like tiny, sour apples. You can't eat them raw, and I think the trees are grown mainly as ornamental plants. My cousin and I found a recipe for crab apple jelly, so thought we might as well give it a try. To make the jelly, you just boil loads of crab apples and then strain through a sieve like so (please take note of our very advanced juice collecting technique...one of the many uses for Yellow Pages):


After it's been left to strain for a night, you boil the juice with lots of sugar (naturally) and then stick it in jars to set. The end result?


Not the most attractive picture, but yeah. We added some herbs from the garden to give it a little extra flavour. If you're wondering what it tastes like, I don't really know how to describe it besides saying that it's really sweet, and goes really well with roast meat. So kind of in the same league as redcurrant jelly or apple sauce.

Another less conventional preserve we decided to try making was some spicy preserved pears. These actually turned out really nice and were extremely simple, much easier than making jam and having to worry about it not setting/all your teeth falling out from the crazy amount of sugar you ingest tasting it every minute (seriously, it is unavoidable when you're waiting for a huge pot of the stuff to be ready. We felt sick after a couple of hours).


Peel. Chop. Add sugar and spices. Boil.


Then stick in jars with syrup and cloves!


On the same day, we also made spicy plum and apple chutney. I think this actually turned out being the best thing we made, mainly cos I love chutney, especially if it has a bit of sweetness. I gave a few jars to people as presents and they all said they really liked it too!


Fresh organic apples and plums (dead wasp content 2%)


Chopped fruit plus sugar, vinegar, chilli, ginger, lemon juice and sultanas


So at the end of our jam and chutney extravaganza, this is what we ended up with:


I still have lots of jars left. Anyone want some? :P

Sunday 7 September 2008

Mochiko

I've realised that if you take photos of food and it looks like shit, people will be less likely to want to try it. Which is silly really - unattractive food often tastes the best.

I had a spell of glutinous rice fever, so here are two recipes for mochi which I've never tried before.

Mochi bread

I only had green flour in the house (coloured with pandan extract, it's better than putting food colouring in) so I headed to Mare Street to my nearest oriental supermarket, which is Vietnamese. I also ended up getting some flour mix for making Vietnamese crepes, so I'm going to try that some time soon. The mochi bread tasted really good - hard on the outside and sticky on the inside - although next time, I think I'd either make it more sweet by adding chocolate/sweetened red beans, or completely savory. Also, I think if I used brown sugar (or even the green flour) it would have looked much nicer, but I will reiterate the point I made earlier about unattractive looking food :)

Ingredients
100g glutinous rice flour (mochiko)
20g plain flour
1 tbsp soy flour or cheese powder (parmesan cheese or a fake equivalent will do)
1 tbsp milk
200ml water
40g sugar
1/2 tsp salt
30g butter
1 egg, beaten

Method
1. Preheat the oven to gas mark 4/180C
2. Sieve the flours, cheese powder and baking soda into a bowl
3. In a saucepan, boil the water and add the salt and butter. Once the butter has melted, slowly add the mixture to the flour to form a dough.
4. Slowly stir in the milk and beaten egg. If the dough isn't moist enough, or there's still flour at the bottom of the bowl, add a bit of water or oil.
5. Shape into balls and place on a baking tray lined with baking parchment (the original recipe said something about using a piping bag, but it is completely unnecessary!)
6. Bake for 15-20 minutes, then reduce the temperature to gas mark 3/160C, and bake for a further 10 minutes.

Mochi ice cream

This is just normal mochi daifuku, but frozen with an ice cream filling inside. There are lots of recipes online for making mochi, but loads tell you to do it in a microwave...WHY?! It's so much easier on the stove, at least then you can tell when it's done, and you don't need to worry about it exploding, burning or drying up. I have done enough stupid stuff with microwaves on impulse so the risk of messing it up is pretty high for me.
Ingredients
1 1/2 cups glutinous rice flour (mochiko)
1 1/2 cups water
1/2 cup caster sugar
Lots of potato starch
food colouring and a splash of vanilla essence (optional)
ice cream
Method
1. First, thaw the ice cream so it is soft (but not runny). Mould into small, teaspoon size balls, and pop back into the freezer so they freeze fully again.
2. Combine the flour, water and sugar in a pan, and stir it a little.
3. Heat the mixture on a moderate heat and stir continuously. It will thicken and become gelatinous quite quickly, and will then stick together in a big lump and become difficult to stir.
4. At that point, transfer the mochi from the pan onto a surface or chopping board which has been dusted with potato starch.
5. Once the mochi has completely cooled, take the frozen ice cream balls out of the freezer. Use a small cookie cutter to cut out bits of mochi and mould it around the ice cream (you need to do this quickly, because the ice cream will start to melt). Make sure your hands are always covered in potato starch, otherwise it'll just stick everywhere and you'll end up with a mess.
6. Transfer to the freezer and wait until the ice cream has frozen completely before eating. If the ice cream melts before you have time to pop them in the freezer, your mochi will be flat, but it isn't that much of a big deal.

--

I found this and figured the reason it was unpublished was because I never took any photos of the ugly mochi ice cream and uglier mochi bread. Whoops. I did, however, find a photo of the Vietnamese pancakes (Banh xeo) I made, which were also pretty ugly, so still appropriate for this post, I think.


If you would like to try making this ugly pancake, there's a decent recipe here. Resist the temptation to be sparing with the oil (if you tend to do that) as otherwise the pancakes won't be crispy!

Hope you enjoyed this ugly post.